Next project

A Blog of Yumness


NEXT PROJECT: Coming Soon!

Saturday, 23 November 2013

Cinnamon and Butter Muffins

As usual on a weekend, I wake up pondering the possibilities of what to have for breakfast. On weekends like these then the cupboards look emptier than they usually do as we draw nearer to shopping day. After a spot of researching on Google for some inspiration, I stumbled on something that sounded so delicious that I had to send Gavin out to the shops to get some more butter so that I could make Cinnamon and Butter Muffins. Luckily, everything we had everything else on the list!

Ingredients:
Coating:
4oz Sugar
1/2 tbsp Cinnamon
7oz Butter
Muffins:
10oz Plain Flour
1 1/2 tsp Baking Powder
1/2 tsp Bicarbonate of Soda
1/2 tsp Salt
1/2 tsp Ground Nutmeg
6oz Butter
6oz Sugar
1 egg
200ml Milk

It's personal preference as to whether you want to start the muffin making first or prepare the coating. I started with a bit of both whilst I was waiting for the butter to arrive. 

The oven was preheated to 175°C.


I combined the Sugar and the Cinnamon together in a bowl and left it until later.


I was waiting for my butter at this point, so I started mixing together the dry ingredients for the muffins. I combined the flour, baking powder, bicarbonate of soda, salt and nutmeg in a bowl and put to one side. 


Arrival of butter - Yay! Thank you Gavin!!

Now that I had butter, in a separate bowl (still making the muffins), I added the butter and sugar and mixed until fluffy, then I added the egg and mixed it in.The milk and the dry mix of flour, baking powder, bicarbonate of soda and salt, was added gradually until it was combined.

The mixture was then divided into silicone cases and went into the oven for 20 minutes.


Meanwhile, whilst the muffins were baking, I melted 7oz butter in a saucepan on a medium heat. The butter needed to go beyond just melting though, it needed to simmer for a bit and become transparent. Once we had got to that stage, it was set aside until the muffins were ready to come out of the oven.


When the muffins were ready, they were left to cool slightly, until I was able to pick them up without burning my fingers. I have built up a fairly high tolerance to picking up hot things over the years, so it was not too long until I was able to pick them up.


Holding onto the bottom half of the muffin, they were dunked into the butter, lightly shaken to get rid of excess butter and then rolled in the cinnamon and sugar mix.


As soon as the entire batch had undergone the process, they were ready to be served, they are best served warm, but I did read that you can bake them and pop them into the oven to refresh them if you need to make them a day ahead before adding the topping.
.

They were delicious. They are like a cross between doughnuts and muffins, because of the cinnamon taste, they remind me of Christmas, so much so that I am considering serving them on Christmas morning.


We served them with Bacon drizzled in maple syrup, which was suggested during my Google research, but the general consensus was that the taste of the bacon jarred with the cinnamon. Perhaps they are best served by themselves with a nice cup of tea, that's my future plan anyway. 


Wednesday, 20 November 2013

James' 18th Birthday Cake

I've been quiet for a few weeks on the baking front and this is why. Novelty cakes take quite a lot of planning and this one was the biggest project that I have ever done. 

The Project: James' 18th Birthday Cake
The Theme:  Computers
Ingredients:
For the cake:
36oz Self Raising Flour
36oz Sugar
36oz Butter
18 eggs
For the middle and first layer:
Several boxes of icing sugar
Butter
Cake crumbs (for the first layer only)
For the decoration:
5 and 1/2 packs of black icing
2 Cadbury Wispas
4 Nestle Milky Bars
Silver Paint
Edible Glue
White icing
Liquorice Laces

This cake had 4 elements to it, as all computers do; a tower, mouse, keyboard and monitor. There's usually a couple of things that make me nervous about certain cake projects and with this particular cake, I had one main worry; the monitor. An old fashioned monitor would have been no problem at all, however this is 2013 and flat screens are the norm. This is where things got creative, chocolate was the only answer.

I started with the monitor, I needed time for it to set and it was the piece that was worrying me the most. 

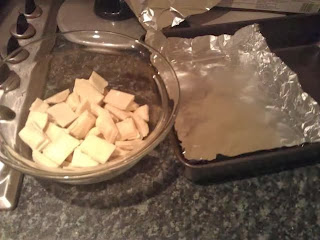
I melted 4 bars of Milky Bar (the big kind), in a bowl over a saucepan. Whilst that was slowly melting and smelling more and more delicious by the second, I lined the tin with foil and partitioned it as my tin was too big. When the chocolate was melted, I poured it into my lined tin and let it cool, then popped it in the fridge


I only actually have one rectangular tin, so I could not start the cake baking until it had set.

On with the baking. I made 3 tins of cake, estimating that I would need three layers for the tower, one layer for the keyboard, some for the mouse and some for the butter icing mix that holds it together (Once again, I still need a bigger mixing bowl) There was a lot of sponge cutting involved but it was the least wasteful option. 


Now that I had my layers baked and iced. I mixed up some butter icing and crumbled some crumbs into it and spread it across the sponge that made up my keyboard. This mix sets and gives the cake an even and smoother finish. I did the same to the mouse and then to the tower and let them set.


Next, I rolled out some black icing and covered the tower, monitor and keyboard.


I covered the mouse, added two buttons and the middle scroll bar.


This is where the tricky decoration begins. I had to meticulously measure out the icing that was going to be used for the keys on the keyboard, position them to check it would fit, and then stick them down. 


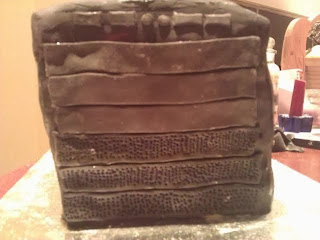
Thankfully, there was very little detail work to be done on the tower. I added the two side vents first by rolling and cutting two squares of black icing. I then used one of my icing tools to create little holes, about halfway through the second one was when I started to lose the will to carry on slightly, but I persevered and managed to finish them. 


After they were safely attached I started work on the front of the tower. I made two buttons, two usb hubs three plain panels and...three more panels with holes in (marvellous).


I then added detail to the buttons, jacks and usb ports by painting them silver


Having completed that, I realised (with the help of Gavin who actually pointed it out), that there should also be a fan on top. I had not accounted for that in my planning. A minor panic and a eureka moment later, I knew how it would work. Create the circle and the blades inside a square and add strips over the top. 


Now that the monitor chocolate was perfectly set and chilled, it was time to ice the edges and make the stands. I rolled out some more black icing and covered the edges


I then covered two Wispa bars in black icing and stuck one to the bottom of the monitor as the first part of the stand.

The final touch to the monitor was to pipe Happy 18th Birthday James.


Rather stupidly, I left the most difficult part until last; the piping of the keys, by this time it was getting late, and I very much regretted leaving it until last. However, I think it turned out quite well after a couple of attempts at a few of the letters and after I had developed a new hatred for the number 7 key with the "&" symbol


All that was left to do was to get it to the restaurant in one piece, stand the monitor up and add the cables. The stand didn't quite work, whether that was because it would not stick to the board or because the chocolate was still too cold, thankfully it was suggested that we use the menu stand behind it, which worked nicely. Project complete!


Total Time Spent: 11 Hours
Useful Tips Gained: avoid panicking, the answer will come to you
Kitchen Items to Purchase: Bigger mixing bowls, more rectangular/square tins
Items added to Amazon Wishlist: None
Miscellaneous items wished for: A kitchen elf to help clean up 

Friday, 1 November 2013

Pumpkin Cupcakes

As it was Halloween yesterday, we decided to carve our own pumpkins.


So we had some great looking scary pumpkins, but that left me wondering what I should create out of the extra pumpkin flesh. I found inspiration from one of my favourite books; The Hummingbird Bakery Cookbook.


All of the pink bits of paper at the bottom of the book are in fact book marks - Gav has been through this book, bookmarking everything he would like made :) This recipe is one of them.

Ingredients:
For the cake:
120g Plain Flour
140g Caster Sugar
1tbsp Baking Powder
1 1/2tsp Ground Cinnamon
Pinch of Salt
40g Unsalted Butter
120ml Milk
2 Eggs
200g Pumpkin Puree
For the icing:
300g Icing Sugar
50g Unsalted Butter
125g Cream Cheese

I actually doubled this recipe, because I had been intending to take some into work for the cake day. 

I started off by boiling the pumpkin flesh until soft (it took about 30 minutes), I left it in a colander whilst it cooled and drained as much water from it as I could. When it was cold, I blended it into a purée.


Then, I mixed together the flour, sugar, cinnamon, salt and butter (at which point I realised that I still had not purchased a bigger bowl). I gradually added the milk and then the eggs. The recipe suggested that I mixed the pumpkin purée into the mixture by hand, I respectfully ignored that advice and gently mixed it in with a spoon. 


After spooning the mixture into a batch of 12 cases I remembered that doubling a recipe that gives you 12, does not always produce 24, baking is in a whole world of it's own and the rules of mathematics do not apply in the same way. I know this, but I never learn. I filled 42 cases with this mixture.

The first 12 did not rise as they should have. The first clue should have been that the mixture was runnier than I had anticipated, as I measured everything out, I assum that it was the pumpkin. It could have been a watery pumpkin or I may not have drained away as much as I thought. Either way, I faced a problem. Before spooning the next 12 into cases I added a couple of tablespoons of Self Raising Flour. This still did not work, they came out of the oven flat. I only had enough mixture to fill 18 more cases, I switched from paper cases to silicon ones, turned the oven down by 10 degrees and kept them in for a little longer. Success! the last 18 came out perfectly.

Whilst waiting for them to cool I was going to start the icing, however I quickly found that I had no icing sugar and therefore the cakes would not make it to work the next day. Instead I iced them this evening, combining the icing ingredients and adding some orange food colouring for that extra festive Halloween feel. I also topped them with a dusting of cinnamon as the recipe recommended.


They were a hit, although pumpkins are not one of the first ingredients you would think to put in a cupcake, if you are stuck with some pumpkin at Halloween and wonder what to do with it - I would recommend giving this recipe a try and any others in The Hummingbird Bakery Cookbook.

Spicy Chocolate Mashed Potato Cupcakes

I start this post with some good news - I bought a sieve!! Now that is out of the way, on to other things...

Every month we have a dress down day and cake day at work, proceeds go to charity, it was our team's turn to bake, I chose this recipe. It is a Delia Smith recipe that I came across whilst looking for more recipes that use mashed potato in cakes (mashed potato in cake is an odd concept, I know, but it's surprisingly delicious) and I came across this one.

Ingredients:
For the cake:
75g Dark Chocolate
50g Condensed Milk
50g Light Muscovado Sugar
75g Butter
110g Mashed Potato
110g Self Raising Flour
1tsp Baking Powder
1 Large Egg
1tsp Chinese Five Spice
For the icing:
75g Milk Chocolate
75g Condensed Milk
10g Butter

I began by preparing the mashed potato, peeled, boiled and mashed - using no salt, no milk and no butter in the mashing process. I then left it to cool. I misjudged the amount of potato slightly and ended up with quite a bit more mash than I had intended, but that was okay because Delia said you can freeze it and use for another time - Yay!


When it was cooled I started on the rest of the baking, by melting together the dark chocolate, condensed milk, sugar and butter in a bowl over a pan of water (using a metal spoon because for some reason it has been ingrained in by brain to always use a metal spoon when working with melted chocolate, I'm not even sure where I got that information from, possibly Mum).


Once it was all melted I combined the rest of the ingredients, only I would avoid my little trick of throwing half of the mashed potato on the floor when weighing it out. It turns out that it's messy and the time it takes to clear it up eats into your baking time, the brightside is that, because I made too much, I still had plenty left to bake with - no need for those freezer bags after all! 

Then I gently folded in the chocolate melted goodness and spooned into cases, popped into the oven and baked for about 15 minutes. 


After washing things up, because I realised that I'd used a considerable amount of bowls already, I got to work on the icing. This again involved melting the chocolate, condensed milk and butter in a bowl over a pan of boiling water, once it had cooled slightly, I iced the cupcakes and topped them with grated white chocolate.


They were received with mixed feelings. Some absolutely loved them, whilst others absolutely hated them. I fall into the latter category, my opinion on chocolate is that it is perfect already, why tamper with an amazing taste? But then again, I do not bake for myself. 

The mashed potato cakes that I have made previously have been completely gluten free, as the potato is supposed to replace the flour, so I was a little confused as to why this recipe has both. All in all, I am not rushing to put one of Delia's recipe books onto my Amazon wishlist, however it's not to say that I will not try another one of her recipe's at a later stage or play with this one until I am happy with it.